Starting a new training plan for 2020, so we start the numbering from 1 one again. It’s going to be an interesting start of the year.
First sessions are going to be with ZWIFT FTP Increase Training Plan. And the title of the plan might have taken things too seriously maybe. The first two “warmup” sessions were hell on earth for me. After a few weeks of break I can say that I took a real training session – were suffering enormously, heart was pounding like crazy and legs working at times like they were made out of rubber.
The first question I’ve asked myself after the 10-minute warmup part was if I haven’t by mistake switched the turbo trainer load to a tad too high setting than required. After next 30 minutes I were nearly sure that my cat has done that for not giving him yesterday his favourite treat and now he’s laughing somewhere behind the corner hearing me suffering, sweating and cursing.
But there is another side of this medal: maybe I just did overestimate my capabilities. Nothing works as bad on your psyche as your training estimated power being below 150W. And you’ve died two times on the way reaching this wonderful result. Well… I did it. Maybe the training sessions I did back in December were just a myth and I were just laying on the couch all the time… just imaging these efforts.
Things definitely need to change. If I’m planning to actually crush this year’s result such situations will of course happen. There is no result without suffering before. A couple of excuses now: maybe it was just a bad day. I haven’t eaten properly before. For sure did not sleep too much lately. But hell… estimated (virtual) power below 150W and that weak leg feeling just after the warmup… c’mon! Nobody would expect such a result and there is no proper justification other than I’m weak.
Plan adjustment: check and modify the estimated FTHR and FTP settings in ZWIFT. Educate myself more on how each setting influences the difficulty level of each workout. And lastly – prepare myself mentally for suffering.
Lessons learned:
As usual: never overestimate your capabilities
Check the turbo trainer settings three times before you start a difficult training session
Get your cat out of your sight – you will think at some point he is laughing of you
How to begin 2020 properly? A “double-twenty” year will be in my case a year with fully planned stucturized workouts, so at the height of the season the form will be at its top.
That is the plan at least… and we all know what life does with the plans.
Nevertheless… ZWIFT Workouts in winter! That is how January will sound like for me. The sound of turbo trainer spinning and people overtaking me on the virtual routes. In comparison to previous year I’ve decided to move to a more interactive training platform – higher availability of ready to use workouts, virtual power estimation (how they call it) could be a new useful metric and tool in progress estimation. But let’s face it – it’s the graphics and the will to get the Tron-wheels that brought me there.
I’ve enrolled immediatelly after the first hardware check to the Build Me Up Training Plan from ZWIFT. It’s a 10-12 week long progressive training plan to improve overall cycling fitness and increase the FTP (comes by the way probably). There are 3-4 sessions planned for each training week, with 1-1,5 hours each. This should put a solid base for further training when it will get a bit warmer and riding on the outside will be an option again.
This training plan starts with an optional Preparation Period, which I plan to take to warm up after more than two weeks of not sitting on the saddle. I’ve scheduled the “proper” plan to start on Monday, with training days on Monday, Wednesday, Friday and optionally Saturday – or a lighter just-for-fun ride will take place on that day if no proper training session will be planned. This is what worked for me last year and I don’t feel like changing something that works. Maybe just a tweak or two along the way, with training hours. With my current work load at my daily job this should play just well.
Not like it will look like in reality.
Since my working hours tend to be flaxible the training plan also has to be. In ZWIFT each workout will be available for a specified amount of time and starting on a specific day. You are not completely free to choose a session from the whole range of workout of your training plan. To prepare for your upcoming weeks I plan to use the suggested Zwift Companion phone app. It allows to see the full training plan up front, with all availability and deadline dates.
And one more nice featue yuu get with this workout plan – you can train on the outside as well. There is a dedicated “I DID IT” button to indicate that it was done outside the application. The workout will count towards the overall plan progress.
Later than the road in the year we will so how I’ve progressed and will decide on any modifications or alterations to the training plan. Couple of Centuries in the middle of the year – this will be a good test for the fitness level and will allow me to use most efficiently weekend in the summer. That is why the whole training is taking place in the first place after all.
I’m not sure if this will be a race-ready state, but time will show.
This is a silly and “for fun” only post with considerations on topic which will not be interesting nearly for anyone. You can safely skip this one and head out to other section of the blog – preferably the ones that give some meaningful training results.
But for all the ones that have not let yet – a quick question for yourself: do you ride your turbo trainer usually in the summer or in the winter?
In my case, as probably in most of your cases it will be winter. In the summer the tarmac is warm enough for more comfortable sessions on the fresh air.
And second question, where do you put your trainer when riding on it?
In the basement? In the garage? Or simply in one of the rooms in your flat? Usually it will be a not too big closed compartment. I’m not talking now to the hardest players that ride in the winter on their balconies or terraces 🙂
I have good news for you then! You have gained yourself a…
Free heater for your home!
Yes – that’s true. Burning calories on the turbo trainer has other benefits as well, beside the loss of fat, growing muscles and likes on Facebook/Instagram. You can also save some dollars on home heating with the use of a very efficient heat source – your own body.
I personally like to keep my flat not too warm. Around 20°C (68°F) during winter time is perfectly comfortable and quite healthy. When riding in the winter quite intensive sessions for about 60-75 minutes each I noticed a constant increase in room temperature. The highes changes have reached 5° difference between the start and the end of the session in a room of about 30m2 (323 square feet).
That may seem not too much, but consider this conversation on Quora. These are some real heating power values. Of course the moment you stop pedalling and your body temperature drops the heating effect will stop and you better put up your heaters again to the temperature at which you like to live in.
So… Only gains, no losses… well… maybe some in bodyweight 🙂 Come and give it a try.
After last year’s sessions in December (although not completed as planned) have given me some confidence what to expect when finished, I was actually positively surprised what came up out of them.
Out of six weeks of training I’ve managed to complete five. Without loosing a day. Consistency pays up apparently not only on paper. The last sessions were challenging and have pushed me to work hard till the end. This is what in my opinion distinguishes unstructurized “passive” pedalling during an average weekend coffee ride from a real training, that will give you meaningful results.
After these couple of weeks I had to take more than a week off the bike, so sat on the saddle fresh and full of optimism. And to be honest I were not disappointed. The whole session was not super easy planned, but went really well. I could easily reach all the % threshold values in every interval and even unintentionally a couple of times broke the grip on the roller when changing pace dramatically.
This gives me nice motivation to continue with the training approach as before.
But I also decided to modify one thing. I decided to cancel my TrainingPeaks premium subscription and head to Zwift. That should be a purely cosmetic decision, as modelling workouts in both tools has a similar mode of complexity, but shoudl add a bit of challenge and interactiveness to the trainings. That is mostly because I do not ride listening to anything on the turbo trainer, so I can focus all attention on one task only properly.
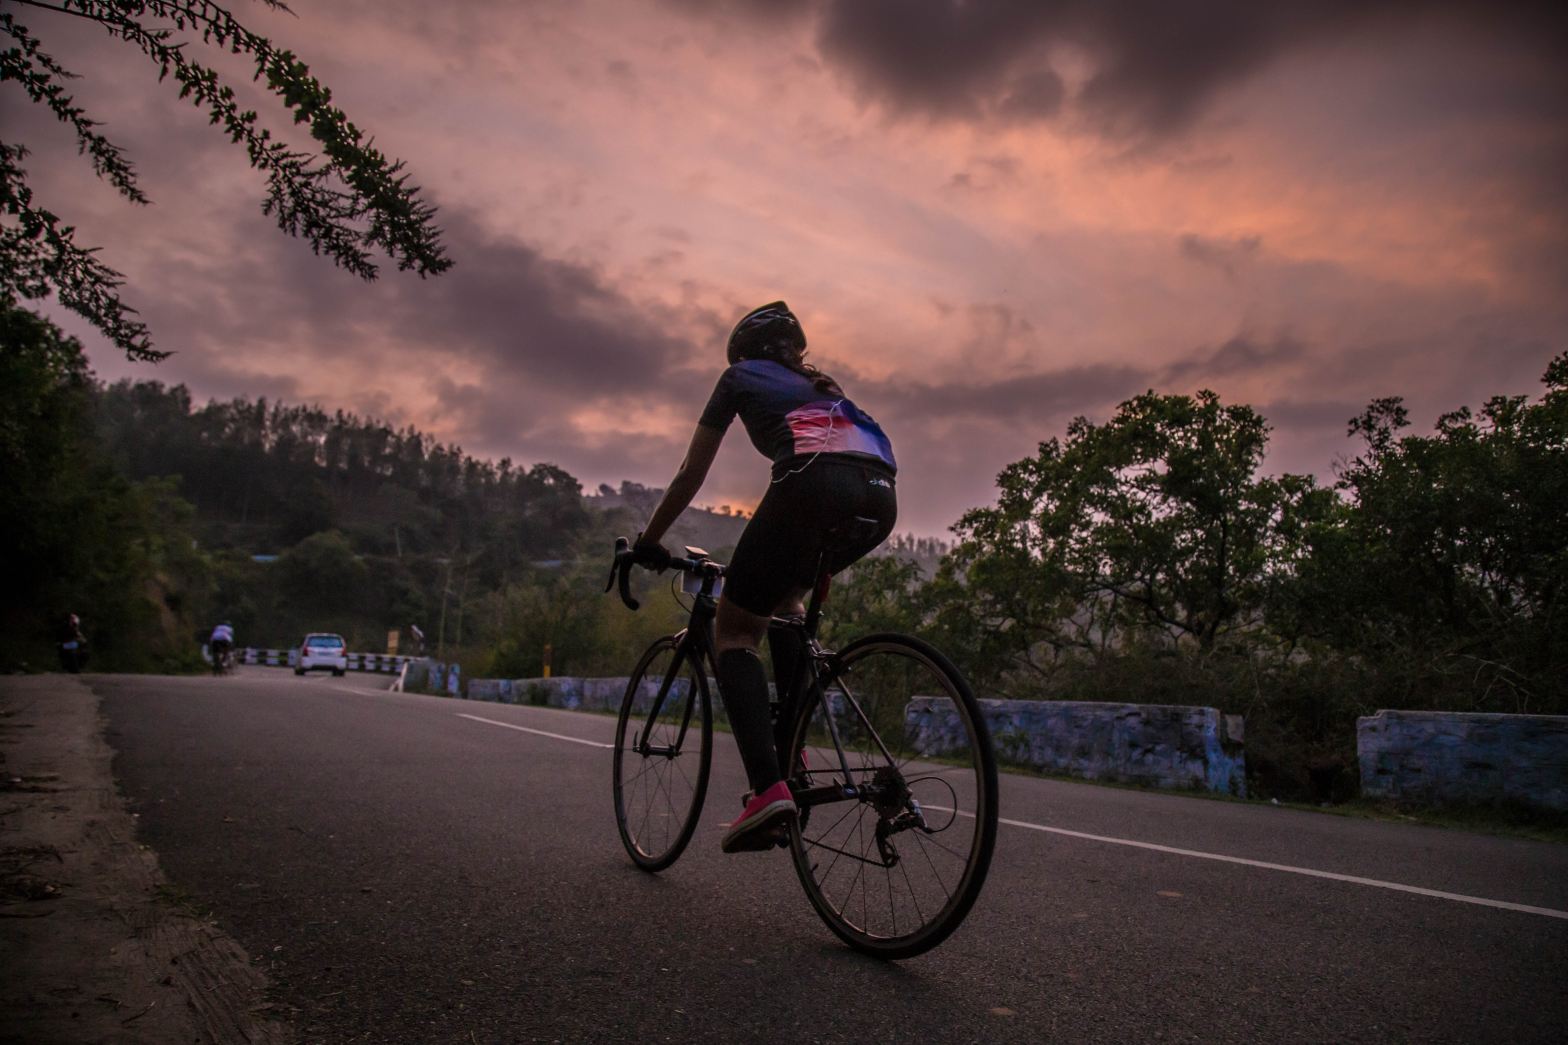
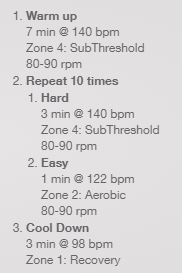
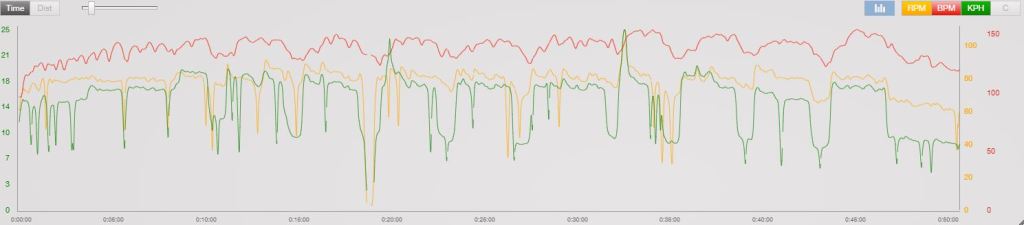
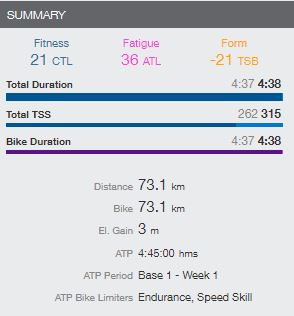
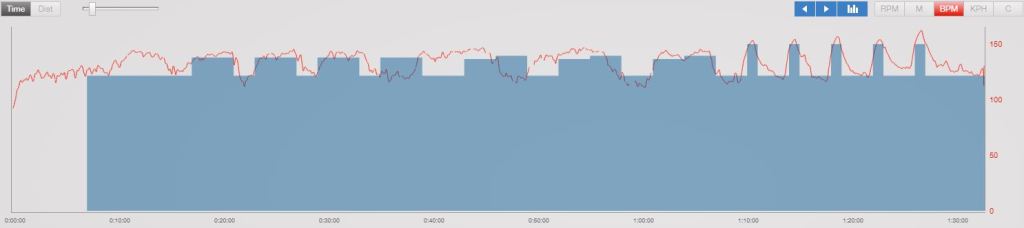
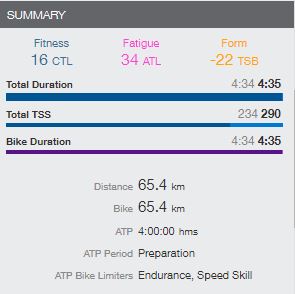
Because of this decision I cannot show the results from this session (last on the TrainingPeaks) the same way as before, so this way has to suffice:
Session planHow the session did go(look at the average cadence! – finally where it should be!)
I’ve had real fun in this sesstion and felt really much power in the legs, nearly no stress in them even after the ond of the session. Let it last like this as long as possible!
I hope this was not just a matter of a good day, but an indication how persistent actions can lead to meaningful results. Trainings and climbing sessions will be very interesting this year.
From next week a new year, new goals and new chaleenges! Cheers!
Do you know the famous Pareto principle? It says, that if you put 20% of total required effort, you will get about 80% of the maximal possible outcome (result). To achieve the remaining 20% of the maximal possible outcome, you have to put 80% more effort. This is a quite universal rule, applying to various aspects of life, business, technology, finances. And the list goes on. In the cycling domain it has also its implications.
Bike price versus performance
Let’s take bicycle purchase as an example. You have probably done that in the past at least once. You have studied many information sources to get the best possible bang for the buck. You have also probably seen many advertisements on the way, which have promised you many advantages for just this one or two dollars more. A lighter and stiffer frame, carbon fork, bigger gear range, etc. The list goes on and on and on… But does this actually matter for an untrained amateur cyclist? Will you get any benefit out of this? Will a 10000$ bike ride 10 times better, faster than a 1000$ bike?
The ugly truth is that not. Probably you will benefit much more from a proper bike fit and a comfortable saddle that a 15g lighter frame at the beginning. The cost of developing a bike from average to great in tremendous unfortunately and this has a reflection in their price. The average bicycle is the the “20% effort” – you will do nearly anything you want with it, but winning the UCI World Cup Championship will be probably out of your reach. But if you will want to try to do this one day, you will have to invest the remaining 80% (time, money, effort).
For an Average Joe, who just wants to enjoy the ride and does not have a body fat percentage close to 6% it will not matter that much, as for an advanced or professional cyclist. The 1000$ bike will be more than enough to begin with the sport and later down the lane will allow you to make adjustments increasing your performance or comfort. And one day you can try the 10 times more expensive one, check this theory and prove me wrong.
We want to get to the top of those 80% results with only 20% effort.
Did you notice the word “effort” in the sentence above? There is no progress without effort. There is no reaction, without action before. At the beginning of your training your progress will be larger, later it will slow down – this is a completely natural thing. Your body will do what it does the best – will adapt. But while adapting it will also grow stronger, you will be faster and will endure more. So train consistently and regularly and you will see results – and one day you will feel that the bike, not you, is the part that needs an upgrade.
Lose some weight first – get a better power-to-weight ratio, instead of joining weight-weenies ranks and exchange steel screws in favour of titanium ones. There will be time for this kind of actions later down the road. But at the beginning of your amateur cycling adventure focus on the engine that powers this machine, feed it, grow it, train it and you will end up overtaking local MAMILs on the uphils in no time.
And for the bike example – just buy the one you like visually the most and that sits well under you. It is the one you will ride the most – that is the brutal truth. Very few people ride on ugly, uncomfortable bikes.
This will not be a complete guide how to start tranining cycling at home, but rather a set of observations and conclusions, reflecting my view on AMATEUR cycling training equipment.
You can spend thousands and thousands of dollars/euros on equipment that you will not ever use, or will not use in more than 10% of its capability. In my opinion, especially at the very beginning of your adventure in indoor cycling you should find a good balance between price and performance parameters, so that you will put your money where its needed, to save for some features that will make the time on the trainer less painful.
Must haves:
(Turbo) Cycling Home Trainer There are probably million models that you can choose from. There are also million guides/Youtube videos about selecting the perfect trainer. But coming down to the very basics – what do you actually need and what is just an extra?
Simply put – the trainer has to be stable when the bike is locked into it, so that you not fall on the ground with it during your first sprint. Sit on one at least with a bike locked into it and check if you feel confident when simply riding on it. Are you ok with its behaviour when you sprint or put more power on the pedals. When you’ve sprinted on it for 10 seconds, did it move on the floor? Check if it will not damage your flooring.
It musn not be too loud. Believe me, you do not want another washing maschine in your flat/garage. It’s just purely annoying. Get one with decent bearings and no too loud brake, that will not make you throw the trainer into the bin after the first training session.
It has to have a reasonable load regulation. What does it mean “reasonable”? Strong enough to allow you reach your desired heart-rate and/or power on the pedals. With a bit of space when you will get stronger. Anything around 600-700W should get you started. As with everything – when you get better, you can get a new one. Do not invest in an intelligent 2000W monster with electrical load, if you don’t know yet if you will like to traning in this way.
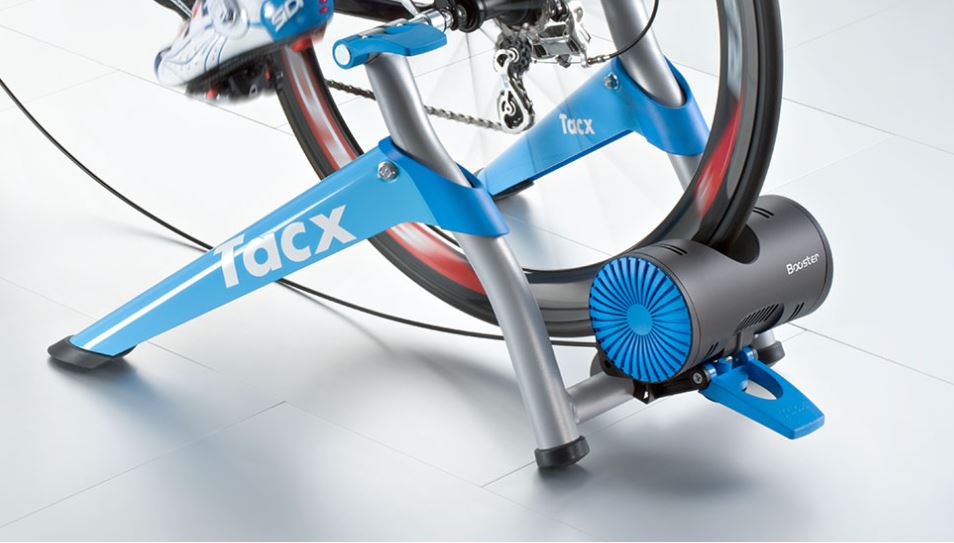
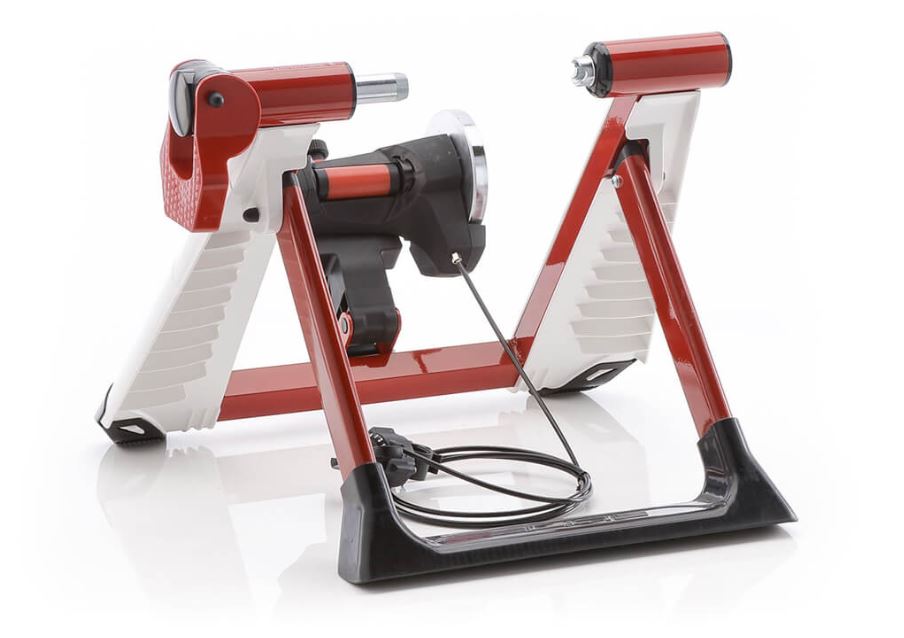
A simple suggestion is to get a basic, sturdy Tacx or Elite trainer. Doesn’t have to be from the latest collection. Or visit your local Decathlon or local bike store to get a feeling on the one you will spend a couple of hours in the next weeks.
Tacx Booster basic home trainerElite Novo Force basic home trainer
Optionally, borrow one from a friend or lend at your local bike store for the season. This kind of service is getting popular and will let you enjoy your first season on a trainer, without fear, that you will end up with a piece of junk at home.
Towel or Frame Cover
These get useful quite quickly, if you’re not planning just to sit on the rig and watch TV (that would be an odd and uncomfortable option though). When you make an effort and want to keep up with scheduled traning session you have to be ready that a drop or two of sweat will appear. Even when traning in your garage at 0 degrees Celsius.
There are two basic solutions to this problem – mostly depending on the fact if you do mind taking your hands off the bar during the ride. Or rather if you have time to do so – during intensive sessions with prelonged high-effort intervals there may bo no sufficient time even to reach for the towel. And the last thing you want to have at the end of the home training season is a rusty and full of salt stem area.
Tacx frame cover
One prefer to have the towel, one to protect the bike with a frame cover, some even use both. Pick your prefered solution.
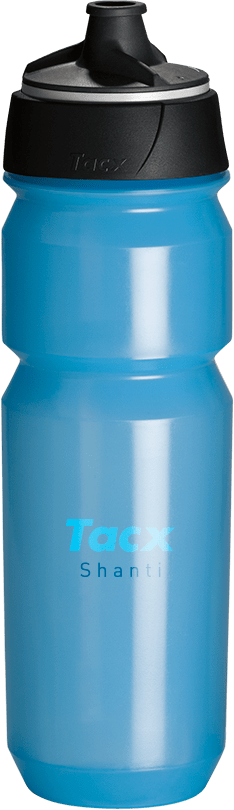
Bottle of water
Keep it simple – a bottle of water, isotonic drink or whatever else you like. Attached to the frame as you would be riding on the outside, if you like to simulate outdoor conditions more accurately., or in reach of your arms.
Tacx water bottle
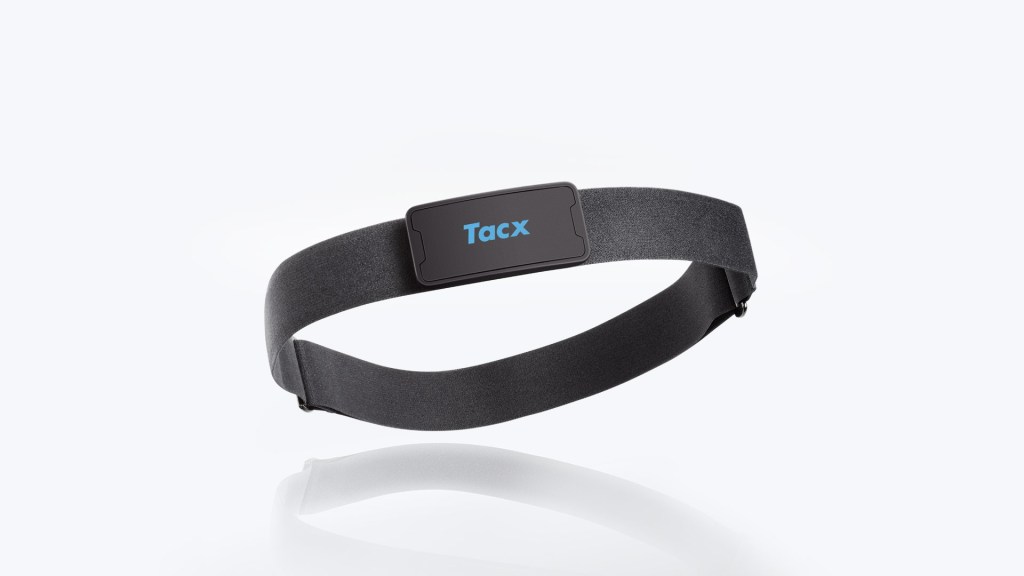
Heart-rate sensor
Chest-mounted or a on your wrist. If you want to make it cheap and easy, get a pedometer with a heart-rate measurement function. Or a smartwatch. The only limitation is that it has to be able to measure your heart-rate constantly and you have to be able so see it constantly, without touching the it constantly. You want to focus on the training and not on your devices.
Tacx Smart heart-rate measurement band with Bluetooth and ANT+
Chest mounted devices are considered to be more accurate and react to changes in heart-rate quicker, but they will require an additional device which will be able to display the measured heart-rate in real time. Not every device is able to do this well, so spend some time researching the topic. Generally speaking, Garmin and Polar smartwatches are considered to be the golden standard in this niche. But as you may have seen already common electrinics manufacturers like Samsung and LG, as well as many Chinese manufacturers are trying their chances here as well.
Garmin Fenix smartwatch range
Sheet of paper with today’s training
Print/write down your today’s training. That’s it. How much time, at which heart-rate (goal or a range). Put it in front of you or simple use a bit of duct tape and attach it to your stem or bars. And then stick to it when you start pedalling.
Options – not neccessary, but give higher comfort
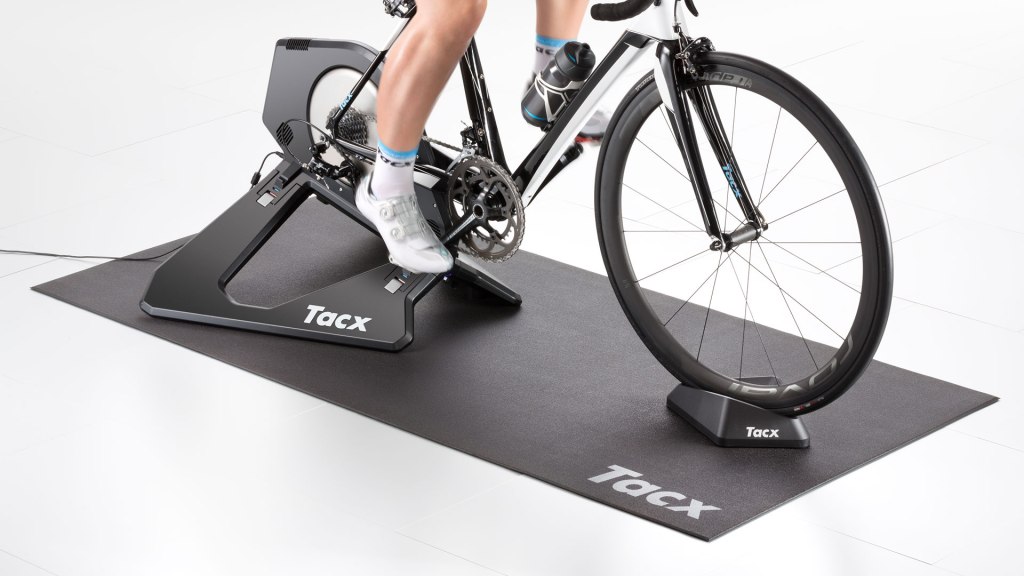
Mat for under the trainer
A trainer mat protects your floor and muffles the noise of your indoor training sessions. When you pedal hard a lot of vibrations and noises come out of the trainer. You can also sweat a bit. Also you may want to move the whole traning rig with the bike locked in the trainer – this helps to do it without much problem and the need to disassemble them.
Tacx training mat
If a dedicated mat is not an option for you, consider at least to put a yoga mat under it. It will serve the same purpose, but at a much lower cost. It will allow you also to clean the space under the bike effortlessly.
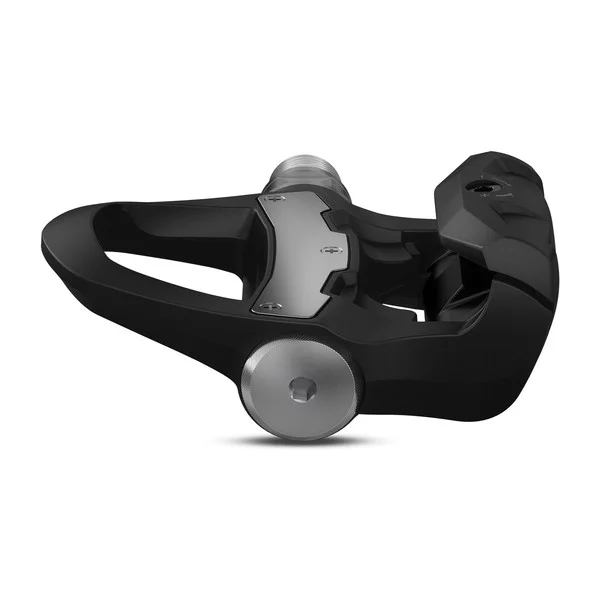
Power meter
We’re getting a bit expensive here, but hell… this is the “Options” section, isn’t it?
A power meter – one sided, two sided. Different manufacturers have their own solutions for their execution. Expensive, more expensive and super expensive. But to be fair, the prices are slowly going down and the technology is getting more and more affordable.
Garmin Vector power meter pedals
If you know already that you are going to stick to cycling traning for a while, definately worth considering. But because of very fast pace of these solutions development and growing number of review around the internet consider researching deeper before you decide to buy one and not get disappointed with the results.
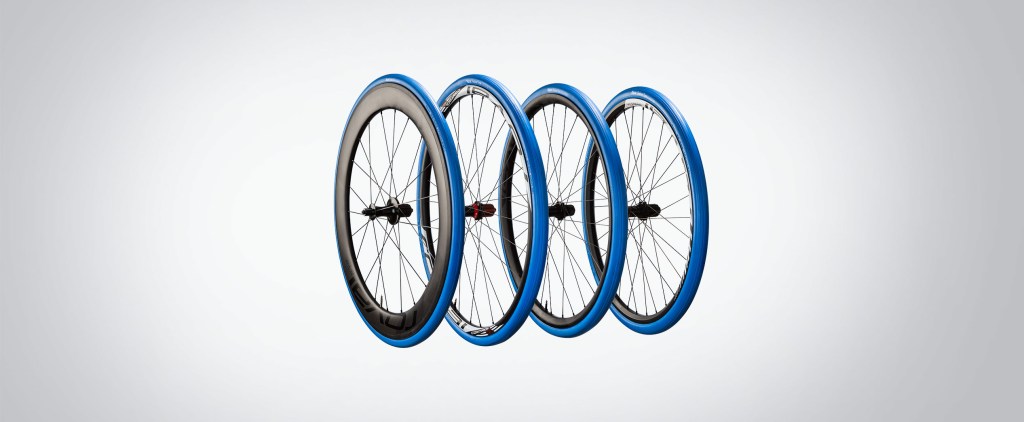
Trainer tyre
You may not know but there are dedicated bike tires for indoor trainiers. Not that you cannot use the regular, black tires on the trainers, but using special ones has their benefits. These are usually not suitable for using on the outside, as they are made from special types of rubber, much thicker on the rolling side of the tyre and they lack the typical tyre thread.
In case of road bikes these may not seem extremely useful, as we you are riding already on a slick or near-slick tyre, so the difference will not be tremendous. If you do use expensive, light racing tires you may find these useful though. When you want to use the trainer with a mountain bike on the other hand they are nearly a must. A tyre with a lot of knobs and thread will be very loud when used on a home trainer. A dedicated tyre will increase the comfort a lot – mostly in terms of noise reduction, proper traction and reduction in tyre wear.
Tacx trainer tyres
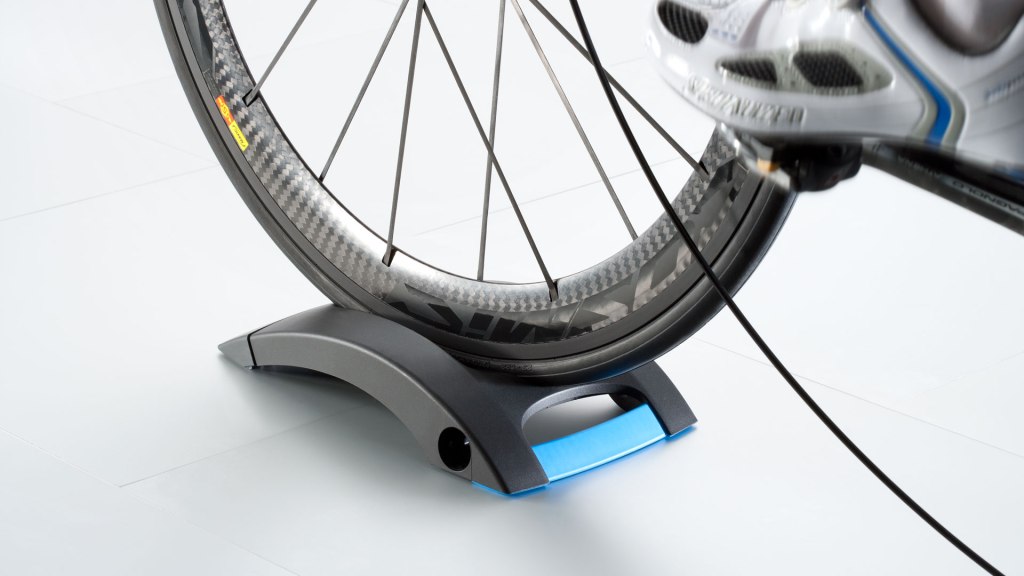
Block under front wheel
When you start using the home trainer you may notice some discomfort, usually connected with the hands or saddle position. This is especially true for road bikes, as you go to the low bar hand position.
When the bike is plugged-in to the trainer its rear wheel is usually lifted by a few centimeters above the ground. This automatically means that the front of the bike is located lower, together with your centre of gravity being pushed to the front. This leads to increased load on the hands and front of the saddle, causing discomfort.
A simple remedy is a small (metal, wooden, etc.) block put under the front wheel, to get the bike back in the correct position. The block size has to be as close as possible to the distance of the rear wheel to the ground. Do not use a book if you thought of that, bastard!
There is a dedicated solution for this problem from most of the trainer manufacturers already:
Tacx Skyliner front wheel block
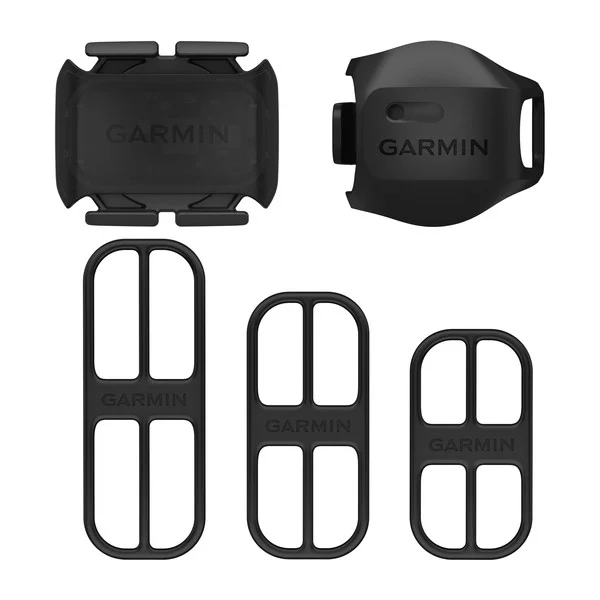
Cadence sensor / Speed sensor
The possible measurements you can get from each ride are not limited only to the heart-rate or power measurements. If you fancy a lot of numbers and data and think you can get something good out of this, just add additional sensors to your setup.
The most common ones are cadence and speed sensors. They both work the same way, showing the revolutions of the crank or the wheel in time. There are multiple solutions on how to achieve these measurements – from simple, magnet based ones, to complicated systems comparing the measured values with GPS data. Also the mounting options differ between manufacturers and solutions.
Garmin speed/cadence sensors
At the end – before you buy a set of additional sensors – be sure to check if you have a device that can handle the data coming from the sensors. Some smartwatches do allow to add additional signals for example, but require to be sent via proper protocols to them. Most sensors communicate using ANT+ or Bluetooth protocols (or both), but most of the common electronics can handle only the latter one. And support only one device to be connected at the same time.
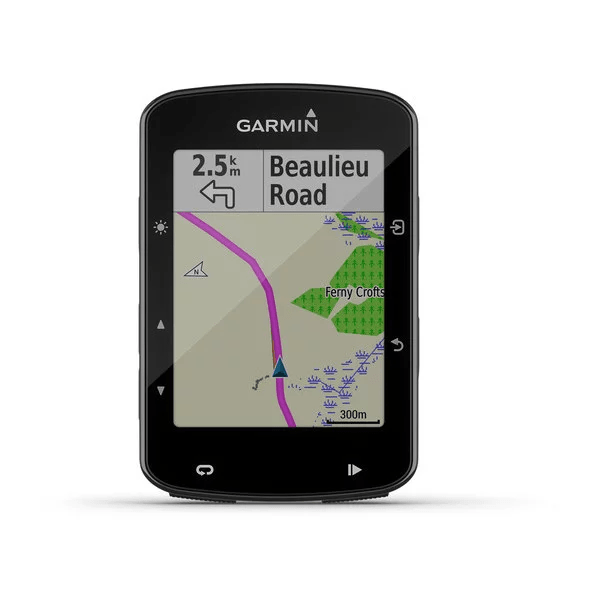
Intelligent cycling computer
As mentioned in earlier paragraph, if you are planning to add additional sensors to your bike setup, you will need a device to connect to them are read-out the data. In cycling world this device is an cycling computer. There are simpler and more advanced versions of these, but they generally serve the same purpose – to gather and display your riding data in front of you, without the need to look at your wrist or reach to your pocket for the phone.
You can use of course a dedicated phone mount and use your mobile device to navigate and display the data, but to get all the features and decent battery life a separate device designed for this purpose is advised. The market is full of different solutions, from a simple 50€ devices with limited capabilities, up to units equipped with GPS navigation, electronic shifting and even electronic home trainer control.
Two main manufacturers of such units are Garmin and Wahoo, with recent introduction of Android based Hammerhead unit.
This is the luxury option nearly – a separate stand for your phone or tablet. There are some training programs on the market for example, that require or rather offer you a chance to see the route (digital, recorded image, etc.) you are riding currently. If using Zwift of Kinomap for example such mount allows you to comfortably navigate through the menu of the software and make changes and selections while on the bike.
You may have noticed a lot of Tacx and Garmin equipment shown above. None of the links above are affiliate links or in any way am I connected to this company. I just find them to be a golden-mean between the price, quality and service. Their range of course in much wider and they provide much more advanced and more expensive devices, but for a statistical amateur their basic offering should be more than sufficient.
The introductry plan was actually to train for 6 weeks and then perform an 8- or 20-minute FTP test. But as it is with plans – they have to be adjusted sometimes when the situation dictates so. And this was the case. Week 5 ist the last one and no FTP test will be performed after. I will try to get on the bike between Christmass and New Year and ride one of my local routes and see if any chages can be felt.
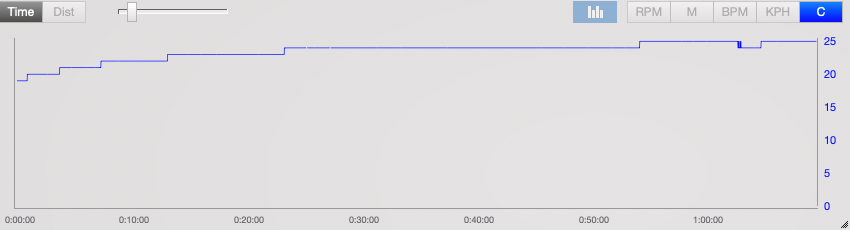
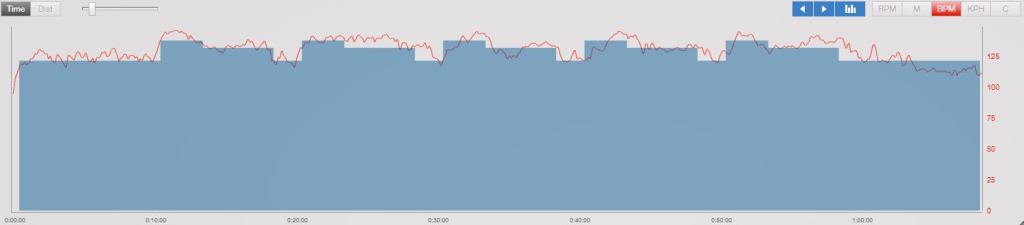
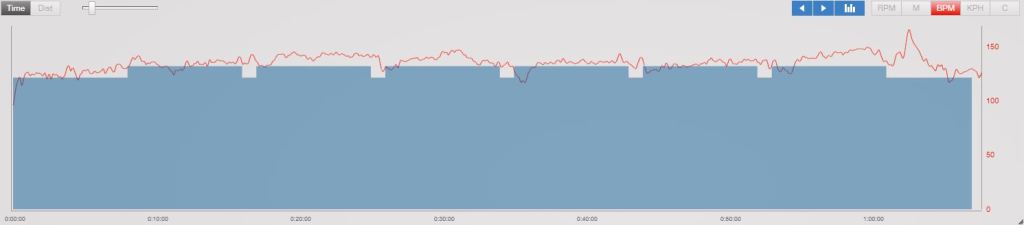
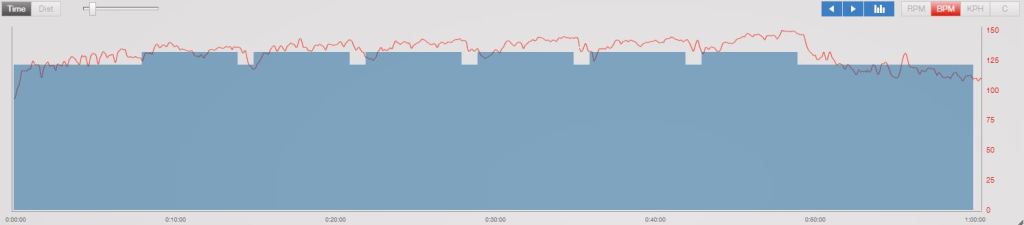
The two harder sessions in the week (Session 2 and 4) were quite difficult now, but not the the level that it was impossible to reach the requested interval heart-rate or keep the pace the for the whole. It can generally be felt in the legs that the I were not laying around the last 5 weeks – some lovels of pain in the knees or in the muscles themselves are visible.
Session 1Session 2Session 3Session 4
The last session was especially interesting, as it was not a classical high-low interval one. Instead it was a two session growing load training, with two 100% FTHR intervals at the end. The interesting thing was that the growing-load parts did actually warmed up the body properly, instead of tiring it too much, which allowed good performance in the last ones. This was definately not expected, as my understanding was that the end will be done already without energy and very difficult.
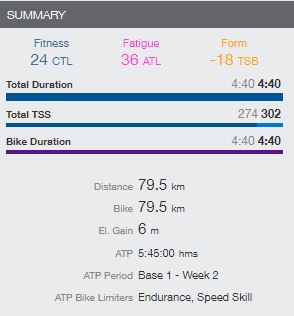
This week’s summary:
Lessons Learned from this week:
regenerate correctly – a good night sleep, a walk the day after can do you only good
eat properly – your body has to have the energy stored to be able to run with higher levels of heart-rate for prelonged periods of time. Eat a lot of carbohydrates the day before an high-effort day. Pasta is your best friend!
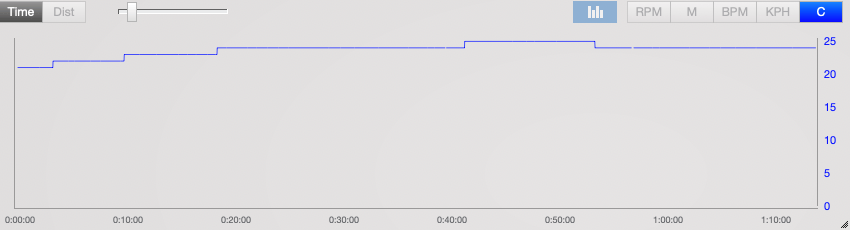
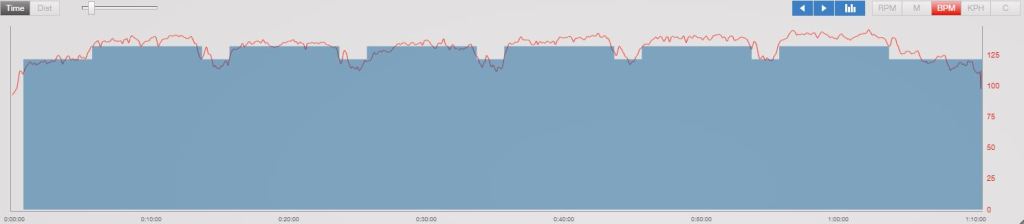
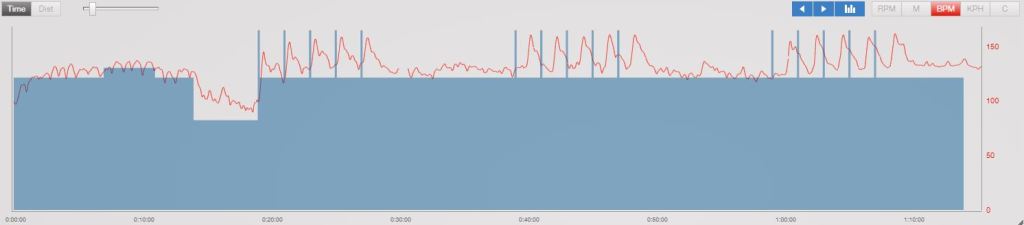
Things have gotten serious this week! For the first time I can say that a session was really challenging. Not to say that the previous weeks went without a sweat, but Session 4 this week has pushed me harder than expected.
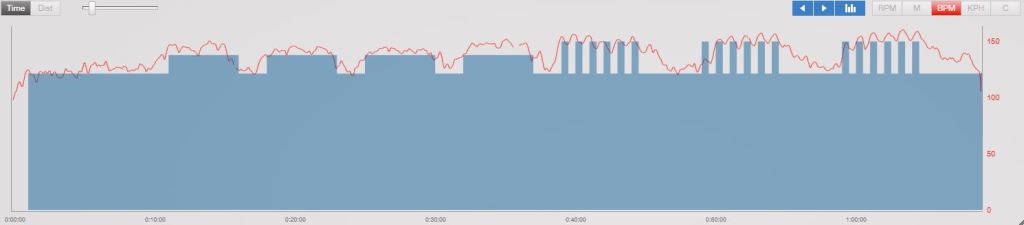
The week consisted of dour sessions – two sets of lighter one first, than a harder one with higher heart-rate (thought short) requirement. In the last session you can see that in the end, after the last stonger and longer intervals the heart-rate did not come back quickly to the level where it should be. These as well have pushed a bit more the mental side, as they required 100% FTHR for longer than before (2 minutes).
Session 1Session 2Session 3Session 4
The last interval set of Session 4 was reflecting something I would describe a two-minute climb and three-minute light descent from a small hill. You could feel your legs definately (and kees unfortunately) at the end of each high-effort interval. But it gave a lot of satisfation as well, as finally a more difficult challenge appeared.
This weeks summary:
Lessons Learned from this week: :
if you feel strong and confident in your capabilities before an unknown event, beware. You may have overestimated your strength.
after a few weeks of not letting go you start feeling your leg muscles after the trainings as well
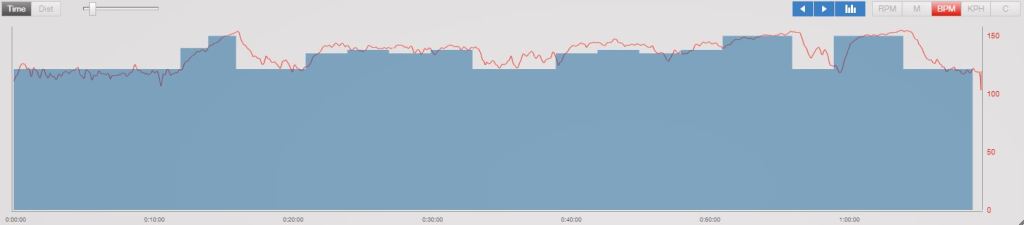
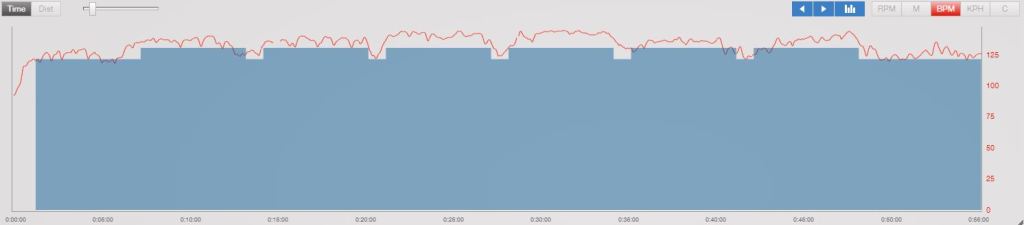
The training plan finally seems to reflect the intention it had from the beginning. The training load seems to be assorted correctly. With each training session, the effort needed is growing.
The plan idea of performing four sessions a week of about an hour each also seems to be a good balance between time requirements and progress. Weekly sessions divided into two blocks of easier training first and harder training the following day also seem to wake-up the muscles well and allow to see progress with each session. Especially the harder pieces of training getting more difficult with each session show visible signs of power improvement and confidence in delivering stronger pedal strokes.
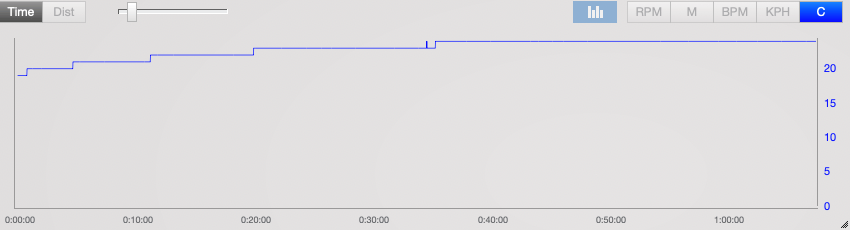
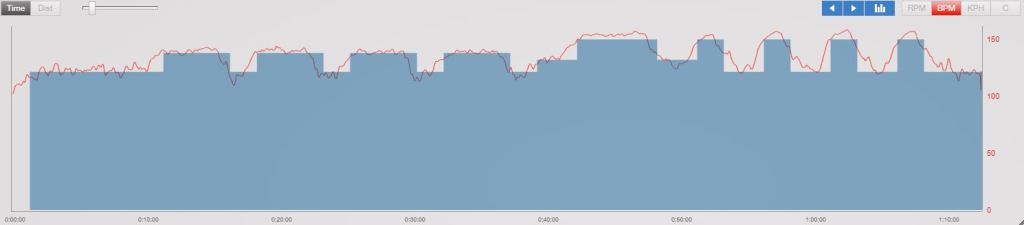
Attention has to be paid how to construct each session. TrainingPeaks allows to define each interval according to a target (of %FTP, %FTHR, maximal power and others) or to be within a range. Both options have their pros and cons. At the beginning of the workout plan I used the range setting, as I were not sure if I will be able to keep up with the target limits of %FTHR for the whole interval time. It appeared to be a good decision – partially because of the mistakes that I did in the first two weeks of setting up the plan and partially because it gave me more confidence in my own capabilities to keep up with the plan assumptions. From week 3 I started using the target setting to define the %FTHR for each interval.
When using the range option you should make a bet with yourself, before you begin the session. The ranges can we narrow or wide, but will allow you to move between two limit values. The more confident and recurrent you will get with each session, you should narrow down the range manually in the plan or force yourself to be in vicinity of the selected part of the range. When you are in harder intervals try to hold the top of the interval limit. When in recovery aim for low part of the desired limit. In longer intervals, it is easier, with very short and intensive ones not necessarily, as the heart-rate will not even reach the requested value probably.
Session 1Session 2Session 3Session 4
This weeks summary:
Lessons Learned from this week:
spend appropriate amount of time on planning and checking that the parameters you have input to your plan are reasonable and achievable
there will be mistakes at the beginning – it’s how life goes
it’s not getting easier – you are getting better ( cliché, famous quote time)