We also have to take into consideration many external parameters, that influence the heart rate readings. If you have slept better or worst last night, if you’re under much stress lately or at the moment, if you have taken a couple of deeper breaths or took a few sips from the water bottle – all of these will be visible for your heart and consequently on the heart-rate diagram after the training. A lot of external conditions and influencing factors are playing a role and the only correct way of dealing with them is to look at the heart-rate measurement reading in a long-term way. By this is meant not to look at temporary ups and downs in the reading, but looking at the “direction” where it’s going.
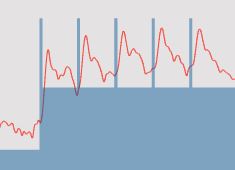
Heart-rate at short intervals with large differences of %FTHR
When a change in effort is taking place it will cause the heart-rate to change as well. The change will come with large probably with a small overshoot and then with some settling time. The settling time is the time from when a change in effort has taken place and the heart-rate reaches its stable value.
There is one more aspect of heart-rate measurement-based training that needs to be addressed. You may see the temptation in consecutive intervals on the same intensity to ride according to heart-rate monitor readings. But in reality you would be riding each next interval with lower power output, as your heart needs to pump more blood to the muscles to keep them going at the same intensity, therefore showing higher BPM values. Therefore in a way we have to not trust the heart-rate monitor reading completely, but rather trust our pedalling power on the first interval. At the end you do not want to get weaker with each interval, but keep the power output constant as much as possible. You may have to remember the gear at which you have ridden in the first interval and at which cadence – and keep with those in the next intervals. This is especially important in case of intervals at the end of the training when your body is tired.
Keeping in mind all of these aspects requires experience and training. You have to observe your body and check how it reacts to various training stresses. This does seem to stay a bit in contrary to the amateur cycling name of this blog. On the other hand you can invest in power measurement system for your bike and not bother with heart-rate training aspects. The choice is always yours.
After three weeks of training, it can be said that the biggest bumps on transferring the training from %FTP based ones to %FTHR have been overcome. Now it will go smoother, at least in the scheduling domain. The problem with all pieces of training based on the heart-rate measurement will still be present and cannot be eliminated completely, but a couple of workarounds can be proposed.
When it goes on the actual training sessions and measurement of the heart-rate a couple of problems have emerged. These are not even technical difficulties, but rather a combination of human body behaviour and specificity of interval training.
In the core of interval training lays a combination of low and high effort intervals. They can be shorter or longer, with the high or low difference of %FTHR between them. As long as the difference of %FTHR is not extremely high and the intervals are long, everything is going as you would suppose it will – after a change in effort the heart-rate increases/decreases to desired %FTHR level.
The problems start when the intervals are getting shorter. The shorter the interval and higher the required change in %FTHR the more time it will take the heart to adjust accordingly. In extreme cases, when you move for example from a recovery interval with 55% FTHR to active one with 100% FTHR that takes only 10 seconds, the heart-rate will not be able to reach the desired level of BPS. The heart-rate starts to react with a delay, dependent on your endurance level and individual conditions. From my observations, it takes about 15-20 seconds to start seeing a rise in heart-rate. You will not reach the desired %FTHR at all in case of such short interval, as the “hard” part was already finished and the heart-rate is dropping.
Heart-rate just doesn’t represent the effort put on the pedals accurately enough, as the power measurement does. As the power measurement is done where the power is actually put (on the pedal or at the crank) and the read-out of visible immediately, without any delay, you can adjust your effort to reach the required %FTP level. No waiting for heart-rate settling, little possible overshoot of the power and easy adjustment after a couple of pedal strokes. Heart-rate measurement shows reaction to changes power or pace slower than the power meter. These qualities make the power measurement worthwhile if you can afford it and will be able to utilize them.
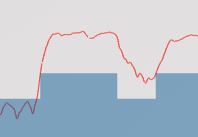
Heart-rate overshoot and settling time
But going back to training based on heart-rate measurement. As written earlier there is also a problem with overshoot when going from regenerative interval to active one. But what is overshoot actually? After the harder interval will start and you have to ramp-up your heart-rate, there is a chance that at the beginning you will actually push too hard, just to reach the correct %FTHR faster. When you reach it, sometimes the heart-rate BPM does rise further, as you have pushed too hard, above the correct level. Then you slow down a bit, put less power, throw a gear or two down and regulate this way the BPM value to the desired %FTHR range. The time between when you cross the desired %FTHR and settle at it finally is called the overshoot – a very common term in control engineering. With time and training sessions passing by you will start to feel what amount of power to put and at which gears to reach the correct level of %FTHR without causing major overshoot in the heart-rate value.
Things have gotten a bit more difficult this week – it means a new mistake has come into play.
Since the plan I have chosen was based on the FTP, not the FTHR, it had to be adjusted to my needs and heart-rate measurement capability, not the power measurement. To do this with some level of approximation you can use the guide from example from TrainingPeaks. This time I made a new mistake in adjusting the plan in TrainingPeaks. You can say it’s partially this software fault, but it’s actually purely my blindness: I selected wrongly the %MHR, instead of the %FTHR. What is MFR you may ask? Instead of the percentage of threshold heart rate, it takes the percentage of maximum heart rate. As you can imagine (or calculate in your head quickly) this does bring a small change to the training routine. Instead of a percentage of around 150 BPM, the training was calculated for 180 BPM. Reaching the required %MHR for values which were intended for %FTHR is really hard. They just lay way higher. This means riding harder. Much, much harder.
Reference unit’s definition in TrainingPeaks.
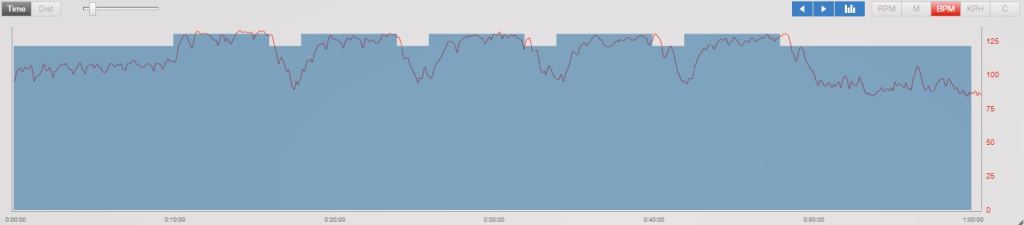
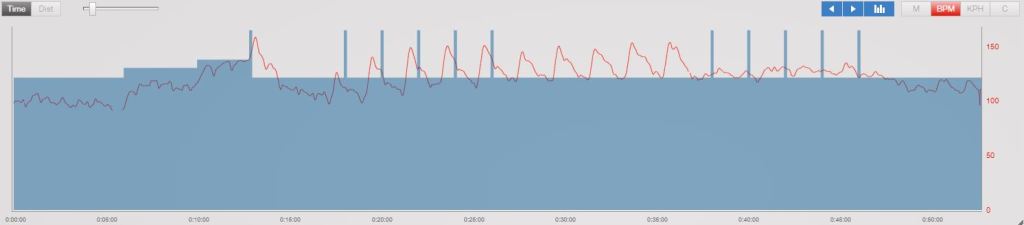
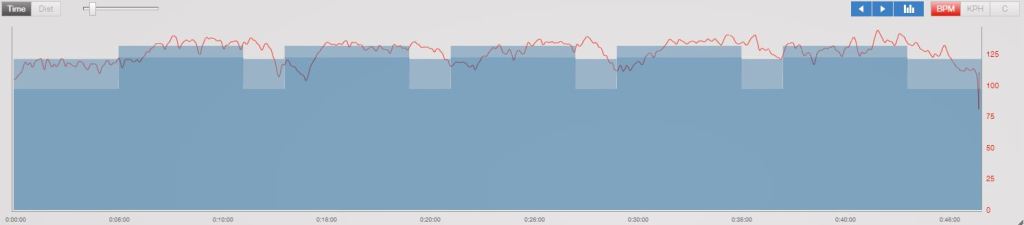
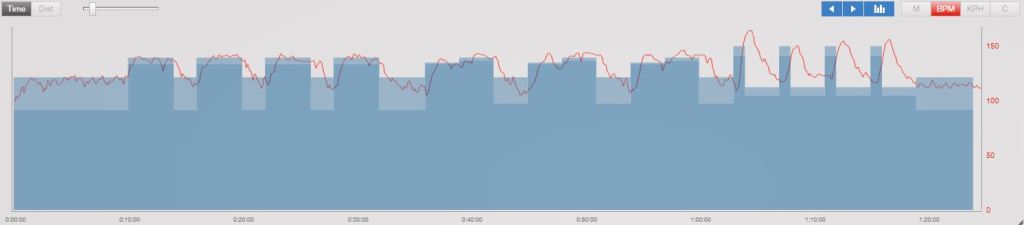
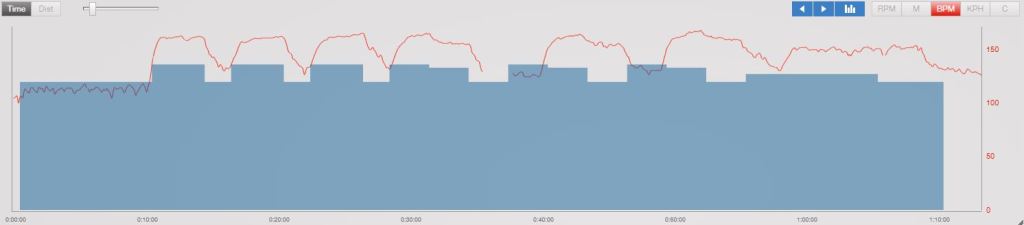
The training was waaaaaaaay too hard. Not a walk in the park. Look at my previous post of relation between these two values and their recalculation. I did start this week’s training without taking this into consideration. And you can see a reflection of this in the heart-rate that I had – barely reaching the required values.
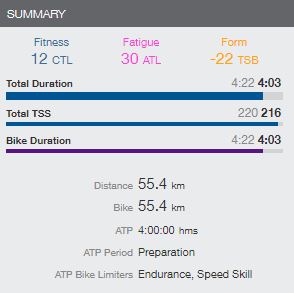
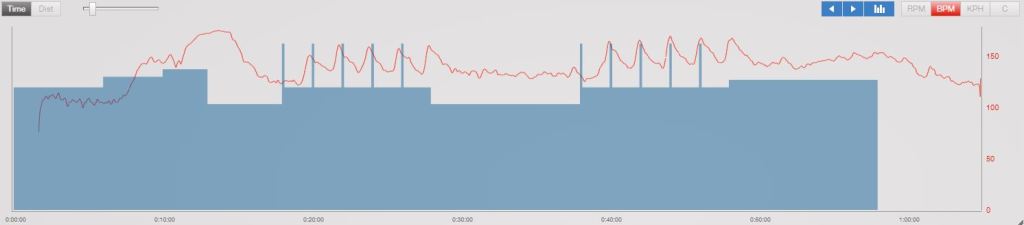
Session 1Session 2Session 3Session 4
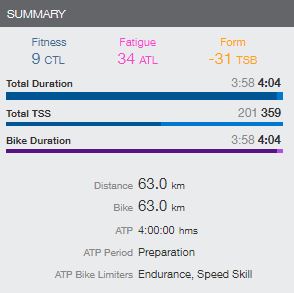
In session 2 I had to shorten the middle, regeneration part by a few minutes, so the peaks before the intervals actually appear earlier than they occured in reality. This is how it unfortunately in life – sometimes you have to make ad hoc adjustments. You will see a reflection of in the total TSS number for this week.
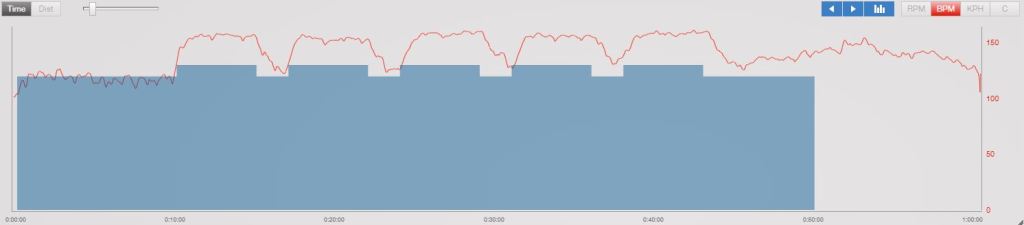
This weeks summary:
Having shown that, please find a set of Lessons Learned from this week:
pay attention to the base value to which you are referring your training zones/measurements (% of Max Heart Rate is definitely not equal to % of Functional Threshold Heart Rate)
if you exceed some planned parameters by far, be cautious – there is a chance that you are not the next Cippolini, but rather have done something wrong in the training preparation phase
the same applies to the opposite situation – if you underperform largely, check your training plan parameters one more time. There may be a checkbox you’ve checked unnecessarily or made a type in parameters definition, etc.
Quick conclusion – it will not be easy. Some parts went as planned, some did not.
But first things first – I took a challenge at the beginning to find a training plan the turbo trainer that will serve as a good warm-up for the next months and will introduce me into the training regime. The choice was limited to plans which do not take much more than an hour a day, for not more than 4-5 days a week and that will take about 4-6 weeks to complete. Each session had to consist of a short warm-up, followed by a series of various difficulty intervals and ending with a cool-down period. You can find millions of such plans on the internet, so don’t waste too much time searching for the “perfect one”, but select one that fits all your requirements and start pedalling.
After setting up the sessions for the first week I’ve begun testing the plan.
Being a lazy person I just took the %FTP values from the plan and put them into TrainingPeaks session planner. Then rode the plan like %FTP = %FTHR. That, at the time of planning, didn’t seem as much of a problem. But believe me, it was.
The first week went like this:
Session 1Session 2Session 3Session 4
As the %FTP and %FTHR have similar values near the sweet-spot and are getting away from each other the further you get from it, I did have an easy training at below the sweet-spot and a very difficult one above it. As I always tried to be in the upper range of the training zone %FTHR I ended up making a lot more effort to ride as the plan required. Better read this article.
This week’s summary:
I sure did make a lot of a couple of harder training sessions. It was difficult, but did it give a proper effect? Maybe. But maybe such effort at the very beginning was unnecessary?
For the next week an correction has to be made to eliminate this mistake.
Lessons Learned:
Don’t oversimplify
Proper research and planning is crucial
If possible find a plan which is based on values which you can measure and interpret correctly
While doing indoor training sessions on your turbo trainer there are a couple of ways how you influence the difficulty of the session. You can either change the resistance setting on the trainer, change the gear on the bike or change the pace at which you are pedaling. The last parameter is know in cycling as cadence.
Why does cadence matter so much?
Since we’re focused on this blog on amateur training we have to limit at the beginning our choices and train as efficiently as possible. At the beginning of our cycling journey we are not accustomed to constant pedaling at all. If you would take a look at a lot of casual and amateur cyclists you will immediately notice that they are stopping the pedaling movement as soon as the occasion comes – wind to the back, riding downhill or simply enjoying the views around, they all are reasons to stop.
Our aim in the beginning of our cycling career should be as smooth and constant dealing stroke as possible. While on the turbo trainer this means constant pedaling. Turbo trainers are great devices to train such behavior, as especially cheaper models with magnetic resistance stop pretty quickly after the force stops being applied to the pedals. Frequent stops and starts lead to increased stress in the legs, as you have to accelerate the trainer from the beginning.
What is the “optimal” cadence?
Constant stroke and pedaling action allows unification of power needed to keep the bike going. But what should be the “ideal” pedaling pace? Many sources claim it should be in range from 80-90 revolutions per minute. That means one full turn of the crank should last shorter than one second – this is an easy way to estimate your pace when you do not own a cadence meter.
But why exactly 80-90 RPM? Some people prefer to ride especially more on the lower range of revolutions per minute. This requires though more power to be delivered from your legs and drains you from power quicker. And power may be needed later. When you will be taking part in a race on day and the race pace will get really fast you may end up having no gears to put to catch up with the group and your body will not be accustomed to high cadence pedaling. For our current needs just assume this is for energy saving reasons. But as well…
(…) studies show a higher cadence means an increase in blood flow to the muscles – which in turn, means more oxygen in the blood and a higher aerobic performance.
In the first training weeks you may notice you will be riding with varying cadence. At the beginning of the training session larger and dropping at the end. Your goal first of all should be to equalize it as much as possible. That is why in the first sessions you should focus on setting the trainer resistance and bike gear on positions that allow you to reach all heart-rate values required by the training session. Keep your eye on the cadence – this in the way how you will regulate the heart-rate. If you will find a good combination of the trainer resistance and bike gears you will be able to go through each session only by changing the pace of your pedaling in the desired range.
Disclaimer – If you are a professional or an “advanced amateur” cyclist, a seasoned trainer or simply a person that doesn’t like simplifications, you should close this site now, dress-up and go for a nice, long ride – the things I’m going to write below will get your blood boiling unneccesarily. The comments below will relate to untrained and weak-legged people, not to you.
In the previus post we discussed the basics of training according to FTP (Functional Threshold Power) and FTHR (Functional Threshold Heart Rate). Today we will tackle with the topic how to plan a training, taking into account the knowledge presented earlier.
Most of the plans, and not without a reason, require you to know what is your fitness level. In cycling world it means to know what your FTP or FTHR values are. This requires you to make a test, before you even begin to train. This approach does not have its merit. If you want to get better, you have to know first where you are currently, to measure the progress.
On the other hand, cycling tests that allow you to measure FTP require certain fitness level already. It is not easy for an untrained cyclist to tackle the easiest version of the test, where you pedal at full power for 8 minutes. Not talking even about the 20 and one hour tests, that are more accurate.
That is why I propose to start somewhere else. To start with about 4-6 week preparation period, before you take the first test. We, the amateurs, are usually far behind with pedaling technique, keeping constant, high cadence, proper breathing and generally putting our bodies under high physical stress. For the first weeks it is crucial to work on preparing your body for higher load of training it will see within next months.
No good training starts without a warm-up!
Find a basic training online that suits your needs – if its weight loss, increasing FTP or simply preparation for first ever 50km ride. Do not start with a super specialized one requiring high loads and spending long hours (more than ca. 6 hours a week) in the saddle. Enjoy the first encounter with a structured training routine. Put it into your calendar. Hang it on the fridge. Put an “x” on each one you successfully finished. Be consequent.
Focus on cadence – check where you limits are. The common rule is that you should be riding with about 80-90 RPM, no matter the speed. Don’t “pump” the crank, rotate it. When you are at the maximum effort, try to make it really the maximum – no putting back. Keep an eye (or rather your ear) on proper breathing. Without enough oxygen you will not be able to maintain long efforts. Breathe deeply – try do lower your heart-rate at recovery zones by this. Check how your pedal stroke looks like. How you keep your foot at various positions of the pedaling stroke. When pedaling correctly we can increase our efficiency and lower the stress on various muscle groups. Save the better trained ones for the end of the training session, when you will be tired and will need them the most. And finally – adjust your sitting position. You shouldn’t be curled behind the handlebar. You are not participating in a time trial. At least not now. In the beginning you have to be comfortable on the saddle. Legs should stretch nearly fully at the bottom position of the leg. Don’t put the saddle too high though – it’s about comfort and efficiency, but also not “dancing around” on the saddle, because you cannot reach the pedal.
Since it’s winter time now where I live, and I am not the biggest fan of outside riding on a race bike in the winter, I will be using a cycling trainer to get into shape. Maybe when one day I’ll get a gravel or a cyclocross bike it will change. But for me the slicks belong on tarmac that has at least +5 degrees Celsius.
As earlier said, the warm-up period for the proper training should take around 4/6 weeks. I have prepare then an intensive, 6 week long training schedule, consisting of various training sessions. From simple endurance building rides, up tp demanding FTP training ones. One session will mean around 60 minutes of work. No more than 4-5 times a week. This will sum up to about 25 hours on the bike in the next weeks. After that an FTP test to check where I land and what needs to be improved. Or rather on which parts the emphasis must be put, so that when the summer will come effects will be visible and felt.
I will be using TrainingPeaks for scheduling trainings. It allows to make a very simple yearly training plan, with all your goals, like races or planned long rides taken into consideration. But this is feature I will come back to after the first weeks. I highly recommend this service, as it has also a very nice and easy to use training builder, which allows you to build a training and start riding within minutes.
Disclaimer – If you are a professional or an “advanced amateur” cyclist, a seasoned trainer or simply a person that doesn’t like simplifications, you should close this site now, dress-up and go for a nice, long ride – the things I’m going to write below will get your blood boiling unneccesarily. The comments below will relate to untrained and weak-legged people, not to you.
Looking at popular sayings you can get inspiration from how the professionals train. Just take a look:
“Train hard or don’t train at all”
“A poor race is better than any training”
“Any training is better than no training”
And my personal favourite:
The more you sweat in training, the less you bleed in battle.
Actually the last one seems quite true. I think it might have something to do with the gym as well. Anyways…
I’m sure they did not come out of nothing. There is something in professional preparations for a race or other sport event, that you have to dedicate yourself absolutely to achieve top form and best performance out of your body. You will have to devote every minute of your day to achieve success. Winners are better from the rest of pack by small margins usually, which come out of full dedication and sacrifice.
But what if cycling is not your way of life, but only a way of active time spending. What if your day is already full of meetings, shopping, taking care of children, etc? What if at best you can get an hour or two a day for your own activities and pleasures?
My answer would be structurised, interval training. Short, intensive sessions that will quickly ramp-up your form, make you a bit physically tired and will provide you with a nice boost of endorfines.
You can find millions of guides on the internet how to plan such a training. You can hire a trainer as well to prepare such a plan for you. I think the most popular places to start looking for these would be TrainingPeaks, Cyklopedia or simply use a functionality of Zwift, if you like training indoors.
The problem with these is that most of them assume that you use a power meter and know your power output parameters as well. Alternatively that you own a smart trainer, which can estimate this. We will try to emulate the power based training, but without a power meter – only using heart-rate as reference. For beginners this should be an accurate-enough approximation.
First-things first – the two most important parameters that we are going to be juggling with the whole time:
FTP (Functional Threshold Power) – is commonly defined as the highest average power you can be held for an hour, measured in watts.
FTHR (Functional Threshold Heart Rate) – is the maximum average heart rate which can be held for 1 hour long during maximum, steady effort. It is measured in Beats Per Minute (BPM).
Because of how hard it is to measure do a constant, one hour effort, without much disturbances, there are two shorter tests that are commonly used to determine these parameters. These are 20-minute and 8-minute FTP tests. If you take the first one you will measure the FTP and decrease the result by 5%. If you take the latter you decrease the result by 10%. But we are not going to take any of these tests for now – first we have to get to know our body a bit more, how it reacts to training, work on our cadence and constant power output. And most of all prepare our body for the stress of structurized training. To start with the training we will assume an arbitrary value of 150 BPM for the FTHR (default value for example from TrainingPeaks) and will adjust later on the way.
The idea of structurized training is based on training in training zones. These are ranges of your power output or heart rate in which different physiological adaptions happen and they do help in varius ways to improve your performance:
• Zone 1 – Recovery The “easiest” zone, workout at this zone, we could colloquially call “coffee ride”. The main goal is to recover your body after hard efforts like intervals, increase blood flow in your legs to let oxygen “clean” your muscle from fatigue. Workout in this zone should be done at least once a week. • Zone 2 – Endurance The relatively easy zone where you increase your aerobic capacity and learn your body to use fats like a source of energy. You should be spending time in this zone but remember to move to zone 1 if you need recovery or to zone 3 if you need to get ready for racing and group rides. Workouts time in this zone can get up to 6 hours. • Zone 3 – Tempo The very active zone between 76% – 90% of your Functional Threshold Power, very good preparation for racing and more intensive intervals like sweet spots and threshold workouts. • Zone 4 – SubThreshold More know like a “Sweet Spot” zone. A very good place to be to increase your FTP, get ready for time trials and long climbs. • Zone 5a – SuperThreshold Most important zone with zone 4 where we “push” our Functional Threshold Power and we are going over it to prepare our body to really high-intensity workouts. • Zone 5b – VO2 max The very hard zone where you can’t stay longer than a few minutes in the row. Very good for shorter uphills or long finishes. Zones range from 106 to 120 % of FTP or > 106 % of FTHR. Intervals up to 8 minutes. • Zone 5c – Anaerobic Your ability for long finishes, short uphills. Intervals from 30 sec – 3 min. Hard to breathe. • Zone 6 – Neuromuscular Power Using ATP (Phosphocreatine) you can source your maximum effort just for about 8-12 sec. It takes about 2-3 min. to restore it. The most important part of intervals in this zone is to go as hard as possible for about 8-12 sec. and then go as easy as possible for about 2-3 min. Zone 6 improve our maximum power very useful at finishes and short fast accelerations.
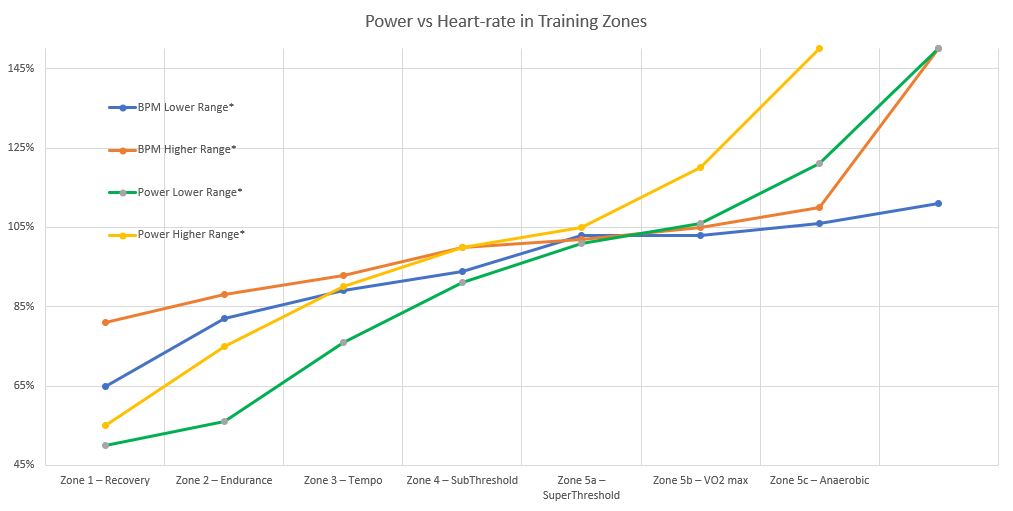
The FTP is located in the same training zone as FTHR. You can see the distribution of training zones in respect to percentage of FTHR and FTP below (assuming FTHR is 150 BPM and FTP is 200W):
FTHR
Zone
BPM Lower Range
BPM Higher Range
Intervals Time
Working range
Zone 1 – Recovery
65%
81%
30 – 90 min.
98 – 122 BPM
Zone 2 – Endurance
82%
88%
60 – 300 min.
123 – 132 BPM
Zone 3 – Tempo
89%
93%
60 – 120 min.
134 – 140 BPM
Zone 4 – SubThreshold
94%
100%
20 – 60 min.
141 – 150 BPM
Zone 5a – SuperThreshold
103%
102%
8 – 20 min.
155 – 153 BPM
Zone 5b – VO2 max
103%
105%
3 – 8 min.
155 – 158 BPM
Zone 5c – Anaerobic
106%
110%
30 sec. – 3 min.
159 – 165 BPM
Zone 6 – Neuromuscular Power
111%
150%
8 – 12 sec.
Max
FTP
Zone
Power Lower Range
Power Higher Range
Intervals Time
Working range
Zone 1 – Recovery
50%
55%
30 – 90 min.
0 – 110 W
Zone 2 – Endurance
56%
75%
60 – 300 min.
112 – 150 W
Zone 3 – Tempo
76%
90%
60 – 120 min.
152 – 180 W
Zone 4 – SubThreshold
91%
100%
20 – 60 min.
182 – 200 W
Zone 5a – SuperThreshold
101%
105%
8 – 20 min.
202 – 210 W
Zone 5b – VO2 max
106%
120%
3 – 8 min.
212 – 240 W
Zone 5c – Anaerobic
121%
150%
30 sec. – 3 min.
242 – 300 W
Zone 6 – Neuromuscular Power
150%
200%
8 – 12 sec.
Maximum
The further you go away up and down from the FTP/FTHR , the more difference between the power and heart-rate you will see. This means that you cannot simply take a training based on FTP and use the %FTP from it directly as %FTHR. In reality the %FTHR lays more flat than %FTP in between traning zones:
Therefore a traning which was written based on FTP has to be “translated” (or rather recalculated) to FTHR.
It has finally happened… These two numbers came into my life together and are the reason for changes to come.
Less movement, unregular eating habits, a bit stress here, an unslept night there. It all has an influence on our health and mental conditions. As time passes and we get older, usually we get heavier and less healthy as well.
It was at least in my case – heavy load at work, too little sleep and sports activities have left me with additional weight on the belly. Even the occasional bike ride or hike cannot justify the general stagnation.
But today marks a change. And this is what is going to happen – one thing that I like for sure is planning, executing, analysing, fine-tuning and repeating, until it works like a Swiss watch. So this are the things you are going to see happening here – not too quick, but a quite detailed journey from a-bit-heavy-cyclist-wannabe to a-bit-less-heavy-cyclist… hopefully.
There will be no slow 3-hour rides here. If the effects have to show themselves in a reasonable amount of time and after reasonable effort, a structurized interval training must come into action.